
|

|
|
|
RV-7 Construction Log
|
Date: 6-2-2012
|
Number of Hours: 11.90
|
Manual Reference: pp 7-4, 7-5
|
Brief Description: Left Leading Edge and Tank Work
|
|
Today I picked up right where I left off yesterday by marking two lines on the bottom outboard main skin that intersect at the tiedown hole which will be used later to locate the tiedown in the leading edge skin. I then removed both bottom skins in preparation for attaching the leading edge and tanks.
I skipped the prep for the stall warning install, as I don't think I'm going to use it. I believe I can make the final decision anytime before riveting the leading edge (assuming I use the leading edge and don't build outboard tanks - another decision I'm still mulling over).
Since I hadn't done any prep of the leading edge ribs when I did the main ribs, I edge deburred and fluted all W-408-1 and W-409 ribs. Unlike the main ribs, I was able to use the scotchbrite wheel to debur the outside of the notches between flange segments. This went quicker than I expected. To properly flute the non pre punched W-408-1 ribs, I clecoed a W-409 rib back-to-back to each one and marked the hole positions.
I then assembled the left leading edge. Inserting the ribs in the skin was fairly straightforward. I found that the most forward rivet hole on the top side was easier to cleco from the inside, then move outside after the rest of the rib was clecoed. After clecoing the LE to the spar I positioned the 408 rib such that its web was flush to edge of the skin, squared it to the spar, and match drilled the flange through the spar.
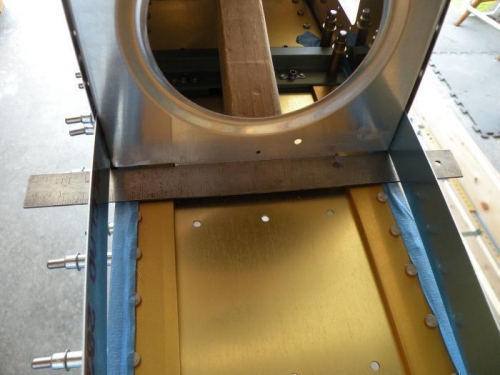
I measured the joint plate and found that it is only about 3/16" longer than the rib flange, so the bend has to be positioned carefully. To do that, I clamped one end of the plate to a 408 rib with about 3/32 overhanging the rib, then bent the plate around the nose of the rib. With only minor difficulty, I got the joint plate in position. I did not match drill the joint plate and rib to the skin, as I'm still considering building outboard fuel tanks using a blank 0.032 skin. I will drill the joint plate to the inboard fuel tank in either case, so it does need to be properly positioned.
|
|
Marking hole positions on a W-408-1 rib.
|
|
W-408-1R rib properly positioned for match drilliing the flange through the spar.
|
|

Joint plate and 408 rib in position.
|
|
|
|
|
|
|
|
|
Copyright © 2001-2024 Matronics. All Rights Reserved.
|